Showing posts with label Festive Baking. Show all posts

Thursday

One a penny, two a penny, hot cross buns

I think the reason that I enjoy making festive treats so much is that it marks the occasion. In our grown-up lives of work and responsibilities it's easy to forget the simple joy of a home-made advent calendar, a Valentine's Day post box or an Easter bonnet. When I make something so seasonal I feel that I'm not just letting the year pass by in a blur but I'm actually stopping to participate in it.

When I was at primary school Easter was a big deal. We made bonnets (crumpled tissue paper glued to a head band) and paraded around the assembly hall like show ponies. We decorated eggs with glitter and sequins and the day ended with the eggstavaganza (sorry) of egg rolling. Yes, every year we would hard boil eggs (usually adding vinegar to the water for its fabled strengthening properties), take them to the top of the hill in the playground and roll them down. After the eggs had been rolled we would tear across the grass, dodging the debris and laughing at those who had forgotten to boil their weapon. The aim was to throw your egg the furthest without it exploding in a flurry of yolk and shell. Ah, those were the days.

Unfortunately, there's no egg rolling for me this year but I have made Hot Cross Buns. At the moment these sweet little buns are available everywhere but I'm never normally tempted. The ones in the shops always look so dry. The other day I poked one in Sainsbury's and it didn't yield a millimetre. Firm and taut is all well and good for a Supermodel's thigh, but when it comes to buns you want soft and giving.

These treats are really simple to make and since most of the preparation time is leaving the yeast to do its thing you're not tied to cooker. Full of fruit and scented with spice they are delicious fresh from the oven or toasted and spread with butter over the next few days.

Hot Cross Buns
(makes 12 large buns)

25g fresh yeast or 15g dried yeast
50g caster sugar
150ml tepid water (1 part boiling and 2 parts cold)
450g strong white bread making flour
1 tsp salt
1/2 tsp ground cinnamon
1 heaped tsp mixed spice
1/2 grated nutmeg (optional)
50g butter
200g mixed sultanas, currants and mixed peel
grated rind of an orange
warm milk and 1 beaten egg to make up 140ml
4 tablespoons of milk boiled with 2 tablespoons of sugar to glaze.
110g plain flour, 25g caster sugar and water to make a paste for the crosses.

  1. Cream the fresh yeast with 1 teaspoon of the sugar and dissolve in the water. If using dried yeast follow the instructions given on the packet.

  2. Sift into a large bowl the flour, salt and spices.

  3. Rub the butter into the flour as if you were making pastry.

  4. Mix in the rest of the sugar and the dried fruit. Make sure you break up any clumps of fruit before adding.

  5. Make a well in the centre of the dry ingredients and add the yeast and the egg/milk mixture.

  6. Combine the mixture into a dough with a wooden spoon and then your hands. The dough should be pliable but not overly sticky. Add a little more warm milk or flour as appropriate.


  7. Knead the dough for around 6 minutes until it is smooth and elastic in texture. Some of the fruit may want to pop out as you do this. Simply push it back in to the dough again.

  8. Leave the dough to rest as you wash the bowl and lightly grease it. Put the ball of dough back into the bowl, cover with cling film and a clean tea towel and leave to rise somewhere warm. Because this is an enriched dough it rises more slowly than normal bread, therefore somewhere warm like an airing cupboard or in a warmed oven with the light on will help the dough rise. Leave it until it has doubled in size (about 1 hour).

  9. Once the dough has risen, turn the it onto a floured board and knead it smooth again. Pinch out any large air bubbles.

  10. Shape the dough into buns (remember that it will spread so don't go too big like my monster buns). You can do this by rolling the dough in your hand and tucking the edges under like a cushion. Mark a cross on top of the buns using a knife. Put them on a greased baking tray.


  11. Loosely cover the buns with cling film and a tea towel and then leave them in your warm place until they have spread and become puffy (about 40 minutes).

  12. In the meantime mix the flour, water and caster sugar together to make a smooth paste. It needs to be a pipeable consistency. Fill a piping bag with a small nozzle or use a freezer bag with the corner cut out.

  13. Preheat the oven to 220 degrees and pipe a cross on your buns. Put them in the oven for 15 minutes or until golden.

  14. While the buns are in the oven, boil the milk and sugar together until it becomes syrupy.

  15. Remove the buns from the oven and put them on a cooling rack. Before they become cool, paint the syrup on top until they gleam.

If you prefer, you can make a hot cross bun loaf with this dough. Instead of dividing the mixture you just put it into a loaf tin and leave out the crosses. Cook the loaf for 10-15 minutes at 200 degrees then lower the temperature to 180 degrees for a further 25-30 minutes or until firm.

Apologies for the less than inspiring photos. I made these this evening and the light in my kitchen is a yukky yukky yellow. Booooo

Sunday

Easter Biscuits

I love that festivities and food are so intertwined. With birthdays come cake, with Christmas comes cake and with Easter comes, err, biscuits. I know many of you will be enjoying Simnel cake, hot cross buns and countless chocolate eggs (and, after my sugar-free stint, I will definitely be joining you) but ever since I can remember we've had Easter Biscuits at this time of the year.

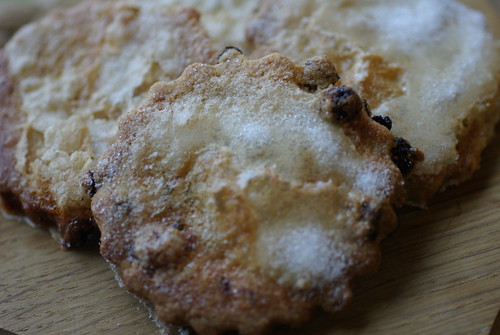
Apparently Easter Biscuits were developed as a lighter, simpler alternative to Hot Cross Buns or Hot Cross Bums as I mistakenly typed to Mr AB the other day (now that would be an interesting recipe). These buttery little biscuits are warm with spices and packed with currants. What makes them really special is the egg white and sugar crust which tops them. Delicious.

I've seen variations of this recipe using different types of dried fruits but I like to keep things traditional. These biscuits are always made with the same recipe from my Mum's 1970s Readers Digest cook book. You can tell that these are one of Mum's favourite recipes because they're one of the few that have the calorie count worked out alongside clearly from her diligent Weight-Watchers days. That said, I've increased the amount of currants slightly and added a little grating of fresh nutmeg.

If you fancy making an Easter treat for someone or , indeed, yourself you can whip these up in 15 or so minutes and have them fresh out of the oven to enjoy. Unfortunately I didn't get to try this batch (only one week to go until I escape my sugar free prison). Instead, I wrapped them up and took them to a friend's birthday lunch. It took discipline to hand them over.

Easter Biscuits
Makes 24 biscuits

4oz butter
5oz caster sugar
2 large eggs (one separated)
3oz currants
6oz plain flour
2oz rice flour
2 teaspoons mixed spice
half a grated nutmeg (optional)
1-2 tablespoons milk
  1. Grease a couple of baking trays or line them with non-stick paper. Preheat the oven to 180 degrees.
  2. Cream the butter with a wooden spoon until soft and add 4oz of the sugar. Beat the sugar and butter until it is light, soft and fluffy.

  3. Add the whole egg and the egg yolk of the second one to the butter mixture. Beat the eggs into the sugar. Add the currants.

  4. Sift the flours together with the spices and mix them into the the creamed ingredients a little at a time. Stir to combine and add a little milk if necessary. You want a soft, pliable dough.

  5. Knead the dough lightly on a floured surface and then roll it out until it is about half a centimetre thick. Cut your biscuits with a fluted cutter and bake in the oven for 15-20 minutes.

  6. After 10 minutes brush the biscuits with the egg white and dredge with the remaining sugar. Return to the oven until the biscuits are golden and the tops are blistered.


Friday

Buttering Up Father Christmas...

Last week I promised you a recipe for Brandy Butter to enjoy with your Christmas Pudding or, indeed, mince pies. Not wanting to incur the wrath of Father Christmas (I'm still holding out for the "nice" list) I will of course oblige.

You've got to love recipes like this. I mean, someone was sat at home with a pastry cup full of candied fruit and thought this really isn't rich enough, hmmm, perhaps some more butter would help. Hmmm not butter on it's own, that's a bid odd. I know! Butter with sugar and alcohol. Great. Anyway, regardless of its non-health-giving properties, brandy butter is a Christmas staple and you've got to "tox" before you can detox, right?

The butter hardens in the fridge so that when you dollop it on top of your warm Christmas Pudding it provides a cool (and slightly boozy) contrast. Traditionally the butter is made with icing sugar, but I like to use light brown sugar to give it a slight caramel flavour, although it's not quite as smooth. Don't feel constrained by brandy if it's not your thing. Rum and whisky work really well and this year I have also made amaretto butter.
If you get a chance, I think this butter would be very good in different guises. Perhaps sandwiched in biscuits or as the buttercream icing on a fairy cake.
Unfortunately this post is somewhat lacking in photos. As the nights draw in I'm finding it harder and harder to get decent light for pictures so you'll just have to make the recipe to get a proper look.

Brandy Butter
3oz unsalted butter
3oz of soft brown sugar (or icing sugar if you prefer a smoother finish)
Grated rind of 1 small orange
2-3 tablespoons of brandy or your favourite spirit
Cream the butter until it is soft and pale.
  1. Beat in the sugar and the orange rind until smooth.
  2. Gradually add the alcohol and beat into the butter until it is well incorporated.
  3. Put the butter in the fridge for a couple of hours or until it hardens.
  4. The butter will melt on top of your warm pud.

PS Blogger keeps losing the formatting on this post - boooo - apologies!

Sunday

Christmas Time, Mincepies and Mulled Wine...

If you were to gather your friends in a mock Family Fortunes style event and ask them to name the foods they most associate with Christmas, mince pies would definitely be up there. Christmas just wouldn't be Christmas without Santa Claus's favourite post-chimney snack.


Apparently mince pies have been around since the days of yore and yes they did used to contain real meat. Nowadays the pie filling is made up of spiced fruits with a little alcohol although some tricksters do like to try and make unwitting foreigners believe otherwise (namely the naughty Housemate with her Greek friend).

Last Christmas we had a big Mince Pie Party at our flat, complete with mulled wine and gingerbread. For me, it was an opportunity to have all our friends drop in for a pie and a glass of festive cheer in a glamorous 50s house-wife cocktail party type style. Unfortunately the Housemate and the Bedmate saw it more as an opportunity to get drunk on mulled wine (they thought I didn't see them sucking the alcohol out of the orange segment dregs) so it wasn't quite as sophisticated as I had hoped. Drunken helpers aside, it was a great party.

This year we were getting ready to launch MPPII, but unfortunately we just couldn't find a suitable date. Well, that's the official line, truth is that the thought of spending the whole weekend making, serving and cleaning up pies for 50 was too much for some people (no names, Mr Bedmate) to cope with. Instead, I made a few trays of pies for us and a couple of friends to enjoy.

I love the fact that mince pies are something that people who don't typically bake will make at Christmas. I just wish that more people would take the logical step of making their own mincemeat to go in the little things. If you're going to go through the rigmarole of making your own pastry (surely the hardest step in the process?) it seems such a shame to waste that effort with sub-standard mincemeat. So many beautiful pies are ruined by acidic, preservative-filled fillings. Is it just me or does your average jar of supermarket mincemeat look like paste?

Making your own mincemeat is ridiculously easy. I mean, it's just stirring. In fact, if you are looking for homemade gifts but you can't face the prospect of getting your rolling pin out, a jar of mincemeat would be an excellent idea. This mincemeat recipe does come with one warning though. I finally convinced my Dad to make his own filing for his lovely mince pies last year. The day after making (and eating most of) the mixture he had a doctor's appointment where he was diagnosed with diabetes. Poor Dad. He still blames this news on the mincemeat. I have to say that the preceding 56 years of sweet treats are more likely to be the culprit.

If you're struggling to feel festive, gather the ingredients for these little pies, put your favourite Christmas CD on in the kitchen and get pie-making. These are excellent gifts (they freeze really well) and even if you don't want to give them away, they are perfect for an afternoon on the sofa watching a Christmas film with your favourite people. I should also say that these little fellas are also perfect specimens for Karyn's and Ann's Mini Pie Revolution.

Homemade Mincemeat

You can make this in advance and store in clean jars until you are ready to use it (or give it as a gift). Alternatively, you can make it the night before you need it and leave it covered in the fridge.This recipe yields 2kg so you will have plenty of filling left. The pastry should make about 24 pies.

450g apples (I used braeburns) grated or chopped finely
225g currants
225g raisins
225g sultanas
125g candied peel
125g glace cherries
125g dates chopped small
225g soft brown sugar
175g grated suet
Grated rind and juice of one lemon
Chopped stem ginger to taste - I also use about 1 tbsp of the syrup from the ginger.
1 tsp cinnamon
1/2 tsp grated nutmeg
5 tbsp rum or any other alcohol you have in the house. I used a mixture of rum and port.

You can add nuts if you fancy them - sometimes I use flaked almonds. You could also use your other favourite dried fruits but you may need to add a little extra liquid; it's not an exact science.

500g plain flour
125g butter
125g lard/shortening
pinch of salt

1 egg to make an egg wash (optional)

  1. Put all the ingredients together in a bowl and stir thoroughly.

  2. Cover the mixture and leave it to mature for at least 24 hours. I kept mine in the fridge for a couple of days before I got round to making the pies. If you are saving some of the mincemeat for gifts or for next year, transfer into sterilized jars and top with a wax circle/lid. Store in a cool, dark place.

  3. When your mincemeat has matured you can make the pastry.

  4. Rub the fats into the flour and salt by hand or by using a food processor.

  5. Add a couple of tablespoons of very cold water and bring the pastry together into a ball.

  6. Chill for an hour or so in the fridge.

  7. Once the pastry is ready to use, roll it out and cut discs for the base of your pies.

  8. Fill the pies with a heaped teaspoon of mincemeat and top with another disk (I used hearts and stars for prettiness sake).

  9. Add a little slit for steam to escape and brush with the beaten egg. I added some cinnamon to the egg wash for extra spice.

  10. Put into a preheated oven (220 degrees) for 20 minutes or until the pies are browned.

  11. Sift with icing-sugar.

  12. Enjoy with mulled wine.*

* The best recipe I've found for mulled wine is from Nigella Lawson's How to be a Domestic Goddess.

Remember to vote for one of the Menu for Hope Prizes!

Now Bring Us Some Figgy Pudding

One of my favourite things about the Christmas season is Advent Calendars. There is something so special about counting down, door by door, to the much anticipated Christmas Day. In this world of instant gratification, where the pleasure of saving up is lost and instead we have the drugery of paying back the credit card long after the excitement of the purchase has worn off, there is something beautiful about the anticipation of 24 little doors made of card.

In the middle of last week my little advent calendar reminded me that I hadn't yet made my Christmas puddings. Unfortunately, I didn't have time to do them until yesterday, eight doors late. Officially, Christmas puddings should be made on "Stir-up Sunday" (the final Sunday before Advent begins. By making your puds this early in the month it gives the flavours chance to mature and deepen (much like a good fruit cake) but I like to think a homemade pudding, made even a week or so late, is still preferable to a the shop bought one. Seriously, if you look at your average supermarket pudding they look like canon balls. Heavy, un-naturally black and always in those red-plastic pots - what's that about? Making one yourself is really simple and if you are looking for home-made gift ideas who wouldn't be happy to receive a little muslin-wrapped bundle of fruity delight?


This recipe makes enough for two 2 litre puddings. I was trying to make lots of little ones to give as presents but after my newly-purchased set of molds met an unfortunate end (note to self: stop swinging your shopping bags when walking on tarmac) I made four 0.5 litre puds instead. I was going to use my slow cooker to steam them, but with a stereotyped lack of spacial awareness, I underestimated how much room the puddings would need so I ended up doing them in batches in my largest saucepan.

One of the traditions of pudding cooking is making a wish when you stir the mixture (anti-clockwise). So, if you don't make a pudding yourself then you miss out on your chance for a wish. What could be better than having a homemade pudding and winning the lottery/meeting your dream partner/world peace?


Traditonal Christmas Pudding
175g plain flour
1/2 tsp salt
1 tsp mixed spice
1/2 tsp cinnamon
1/4 tsp grated nutmeg
125g fresh wholemeal or white breadcrumbs
125g shredded suet
75g demerara sugar
125g raisins
225g currants
225g sultanas
50g chopped candied peel
50g glace cherries
100g chopped dates
25g stem ginger (optional)
1 medium sized apple (grated)
1 medium carrot (grated)
Juice and grated rind of 1 orange and 1 lemon
1 level tablespoon of treacle
2 beaten eggs
200ml stout (I used Guinness)
You will have to leave the mixture to mature overnight so bear this in mind!
  1. Seive the flour, salt and spices into a large bowl.
  2. Add breadcrumbs, suet, sugar and fruit - mix well.
  3. Add grated apple, carrot, rind and juice of the lemon and orange , treacle, eggs and spout. Mix very well together.
  4. Make a wish!
  5. Leave for several hours or overnight.
  6. When you are ready to make the puds, stir the mixture again and put it in your greased basins. Cover the top with two layers of greased proof paper. Make a pleat in the paper so that there is room for the pudding to expand. Add a layer of foil and secure tightly.
  7. Stand the pudding on an upturned saucer, I used a cookie cutter, in a pan and pour boiling water into the pan so it is half way up the side of the pudding basin.
  8. Steam as follows: 1l basin - 8 hours, 600ml - 6 hours, 300ml - 4 hours.
  9. Do not let the puddings boil dry - top up the water as necessary. The puddings are done when a knife inserted into the centre comes out clean.
  10. Remove the grease proof paper and the foil and leave them to cool. Once they are cool add a circle of grease proof paper and re-wrap with foil. Store the puds in a cool place until you are ready to eat them.
  11. When it comes to Christmas day, re-steam the puddings. 3 hours for the large puds, 2 hours for the smaller puds and 1.5 hours for the micro puddings.
  12. Set aflame (vodka produces the best flame) and serve with brandy butter (recipe will follow).